Designing 3D Jigsaw Puzzles in Fusion 360
With 3D printing technology, we have an amazing opportunity to create unique and interesting jigsaw puzzles that go beyond the traditional 2 dimensional method. These types of puzzles are great fun for everyone, with the added benefit that most can be played by people with visual impairments. And the good news is that it's incredibly easy to turn any 3D model into a 3D printable jigsaw!

8th March 2023 • Tips
Today, we’re going to look at how we can do this using Fusion 360 software.
First of all, it’s worth mentioning that there are several methods that can be used to create 3D printable jigsaws. The steps in all methods typically involve creating puzzle pieces and using them like a ‘cookie cutter’ on a 3D model to split it up into multiple pieces that connect together. You can create puzzle pieces using a vector-based graphics software, which can then be imported into your 3D CAD package, or alternatively you can create them directly within Fusion 360. If you’re creating a large size jigsaw with say 40+ pieces, we’d recommend using a vector-based graphics software to create your puzzle pieces as creating these in Fusion might require a lot of processing power. There’s a great tutorial for this by an amazing designer called Devin Montes, who actually inspired us to explore 3D printed jigsaws. You can check that out here.
If you’re looking to create a simpler jigsaw, you can quite easily do all the steps within Fusion 360. Let’s take a look at how to do just that! The example we’ll be using is a 1:50,000 scale contour model of Mount Everest, which we’ll be turning into a 16 piece jigsaw. Please note that the below guide is intended for those who have basic knowledge of Fusion 360.
Step 1: Prepare Model and Create Sketch
The first step involves either creating a new design in Fusion 360 or inserting a mesh file (E.g. an STL from a model repository website). To insert a mesh, go to ‘Insert > Insert Mesh’. You’ll then want to head to the ‘Mesh’ tab and convert it to a solid body by going to ‘Modify > Convert Mesh’ and selecting OK with the default settings. If Fusion 360 doesn’t allow you to convert the mesh due to having too much triangles, try using the ‘Reduce’ tool from the ‘Modify’ tab to bring the triangles down to a manageable number. Once converted, head back to the ‘Solid’ tab.
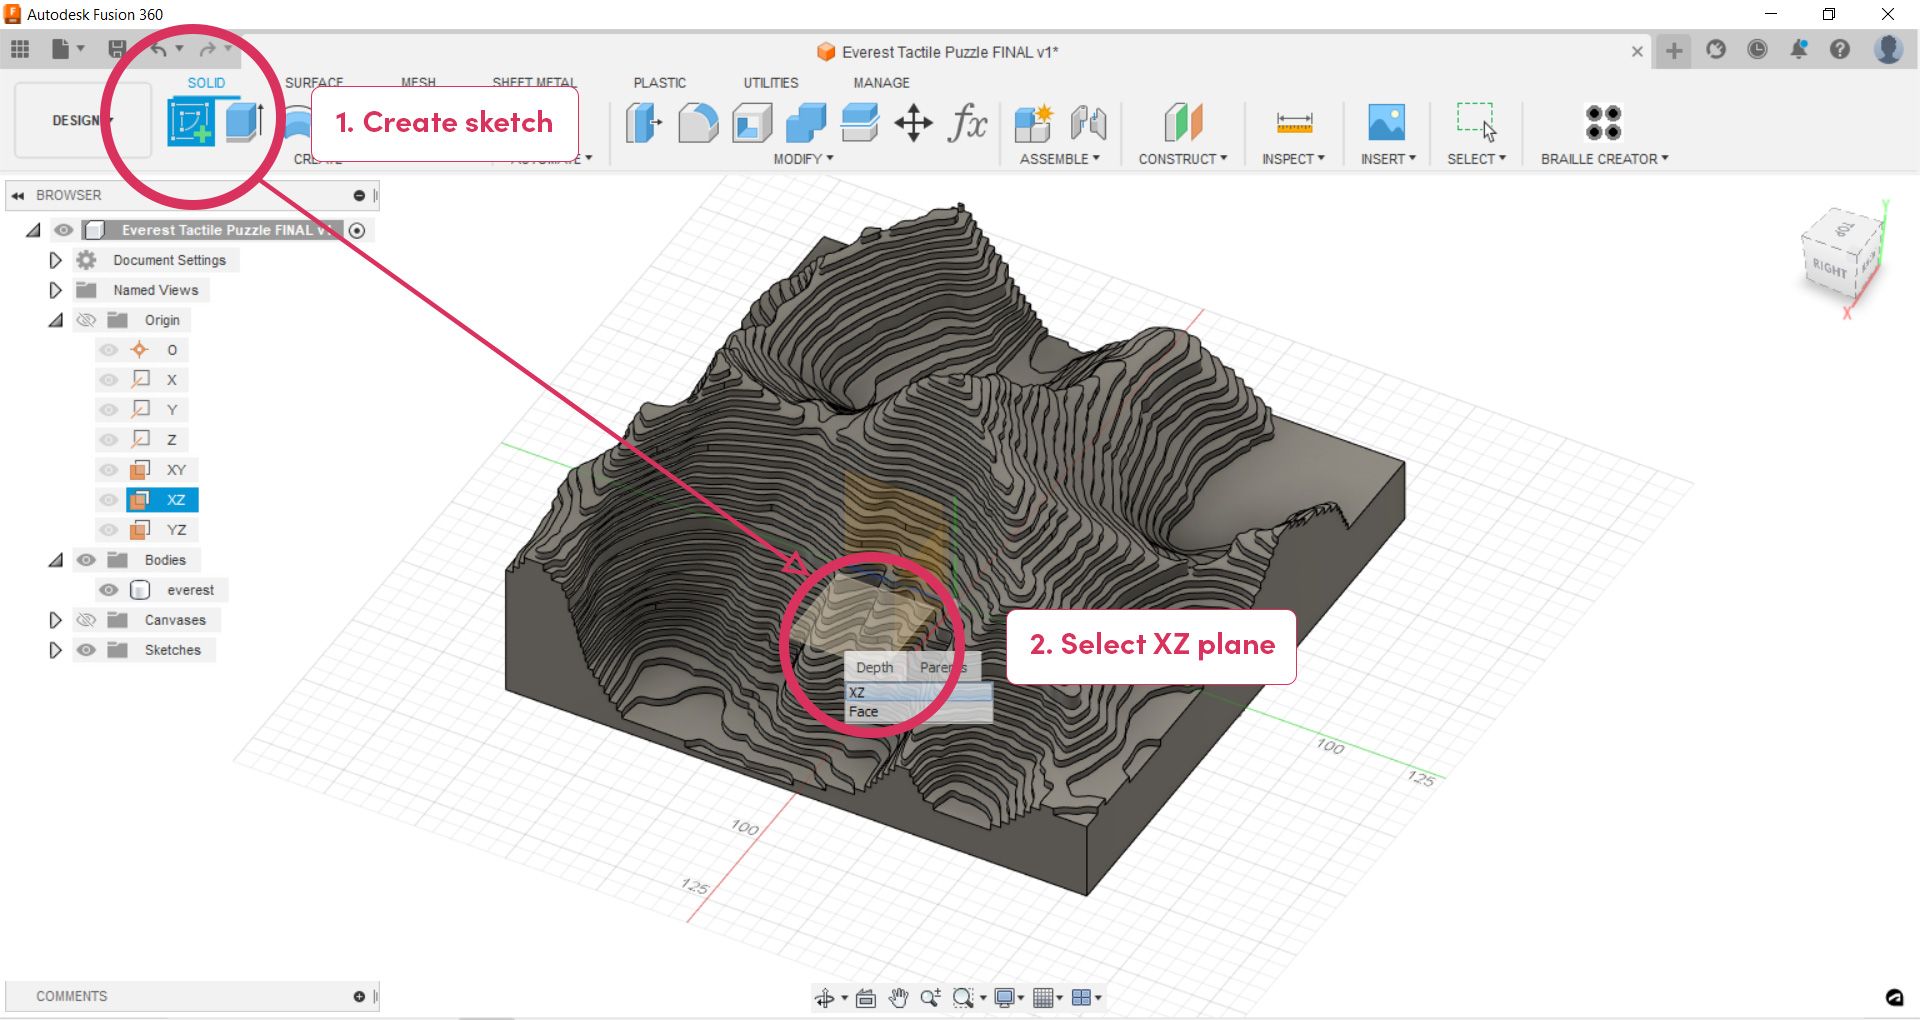
With your design in the workspace, scale it to the size you want your printed jigsaw to be if it is not already at the correct size. You can do this using the ‘Scale’ tool under the ‘Modify’ tab. Then click ‘Create Sketch’ and select the ground plane as shown in the below image. If your model is covering the plane, left-click and hold, then select XZ from the menu that appears.
Step 2: Create Grid
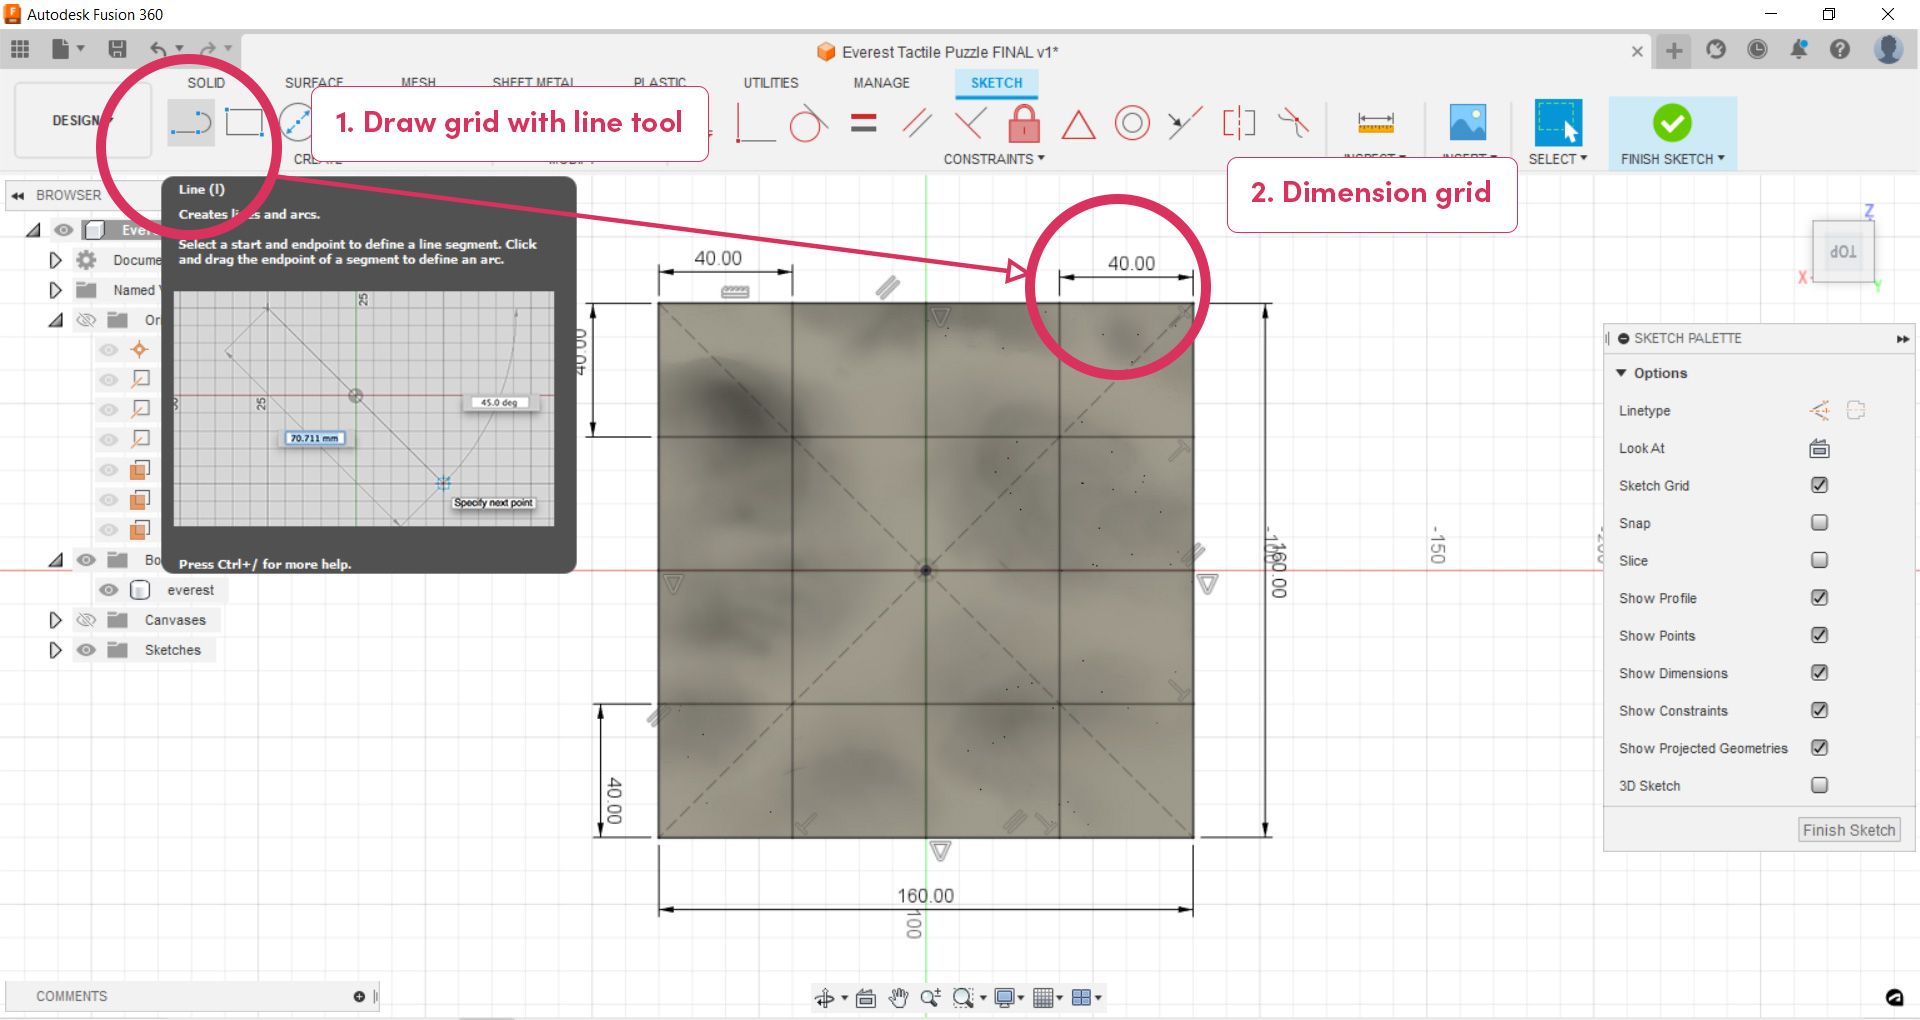
After selecting the plane you wish to sketch on, you’ll head into the sketch environment. From here, activate the ‘Line’ tool and draw out a grid of squares. The number of squares should equal the number of jigsaw pieces you want. In our example below, we drew a rectangle around the edge of the entire model before creating 3 vertical lines and 3 horizontal lines – resulting in 16 squares. Lines were drawn roughly and then we used the dimensions tool (keyboard shortcut ‘D’), together with a bit of math, to ensure all squares were of equal size.
Step 3: Draw Jigsaw Pieces
Whilst still in the sketch environment, the next step is to activate the ‘Fit Point Spline’ tool. This tool is used for drawing curves. You simply click and place a series of points and a curve is created through the points. Feel free to experiment with drawing a few lines to get used to the tool before deleting them and proceeding.
Using the spline tool, draw out your jigsaw pieces like you see in the below image. There are 2 important things to remember here. Firstly, keep your splines relatively close to the grid lines to ensure your jigsaw pieces are roughly the same size. Secondly, start and finish your splines past the boundary of the grid. This is necessary for the extrude feature to work in the next step.

Step 4: Extrude Splines
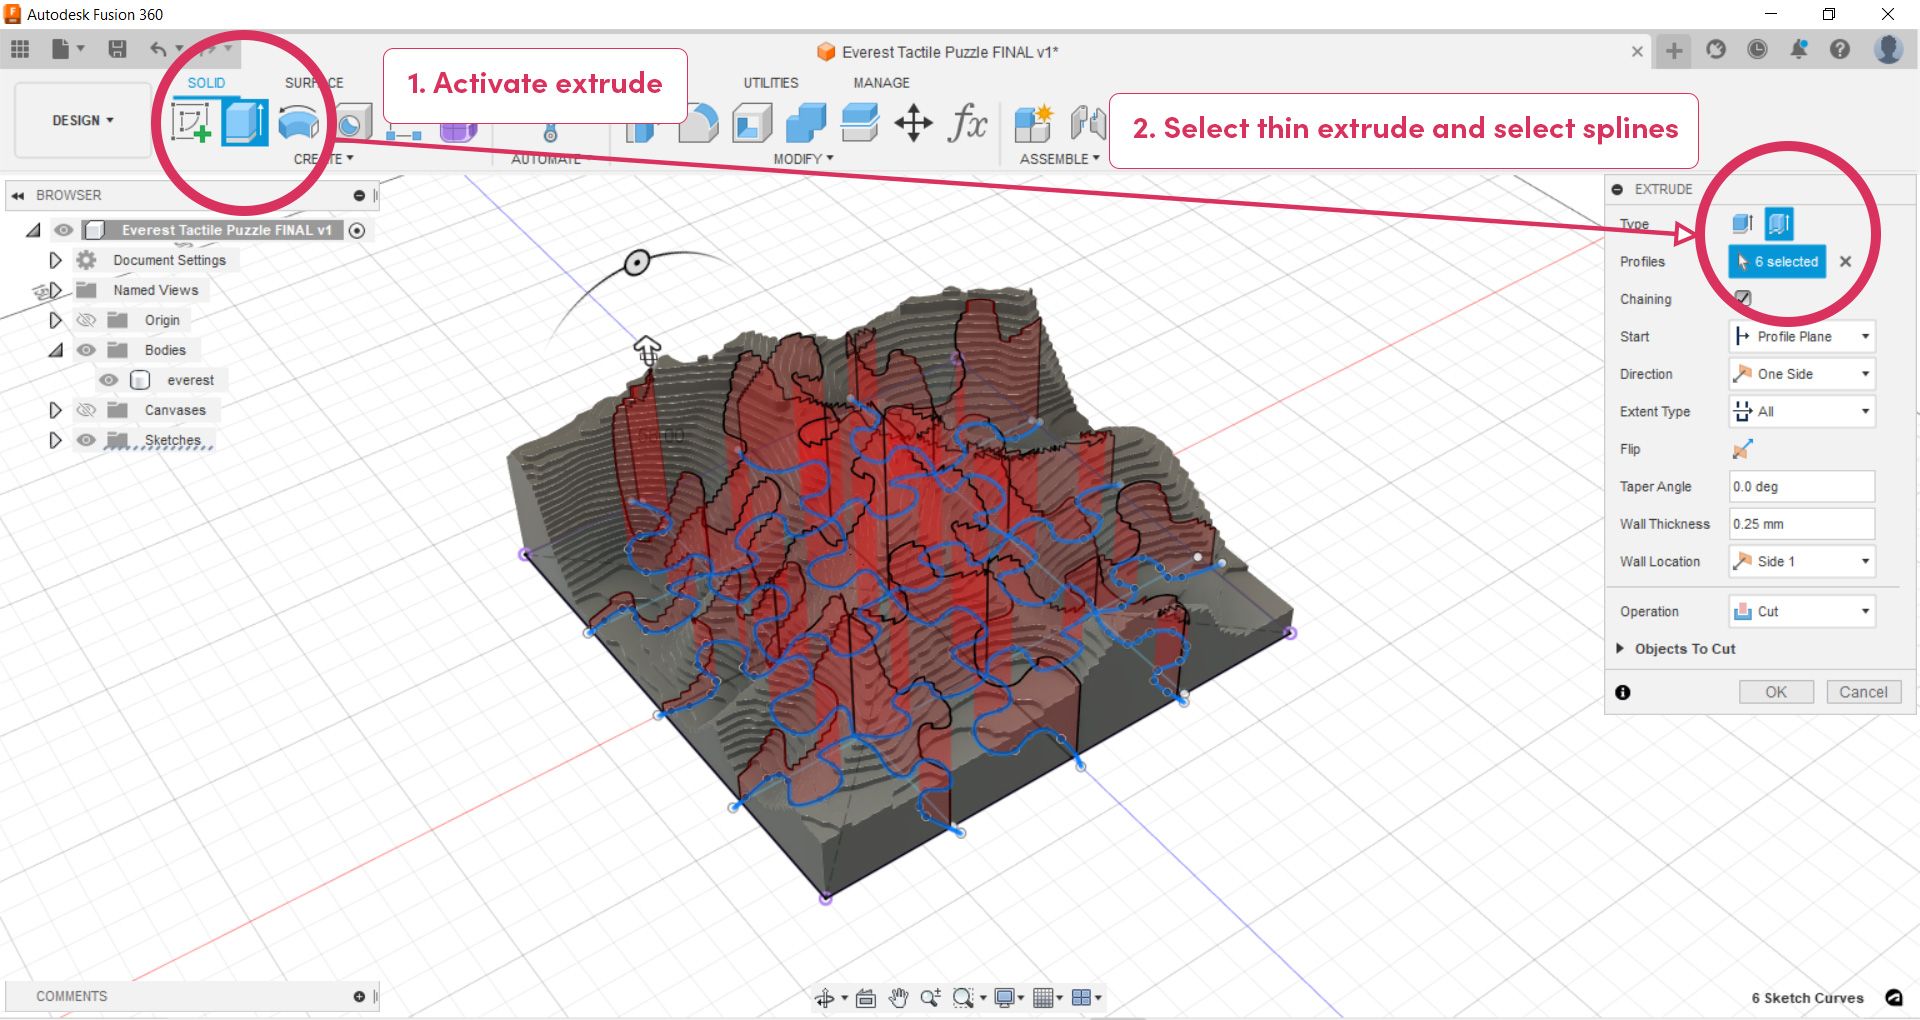
When you’re happy with the positioning of the splines, finish the sketch. From here, activate the ‘Extrude’ tool. This will bring up the Extrude menu where you need to switch the ‘Type’ to ‘Thin Extrude’. You can then select each one of your spline profiles.
In the Extrude menu, change the extent type to ‘All’, the wall location to ‘Center’ and ensure the operation is set to ‘Cut’. The final setting you need to change is the wall thickness and this depends on 1. the tolerance of your 3D printer and 2. your preferences when it comes to how tight you want your puzzle to fit together. We recommend a wall thickness of between 0.2 and 0.35. You can always 3D print 2 test pieces and if you need to change the wall thickness, you can right-click on the extrude in Fusion’s timeline and edit the value. Click ‘OK’ in the Extrude menu when you have inputted the above settings.
Step 5: Export Pieces
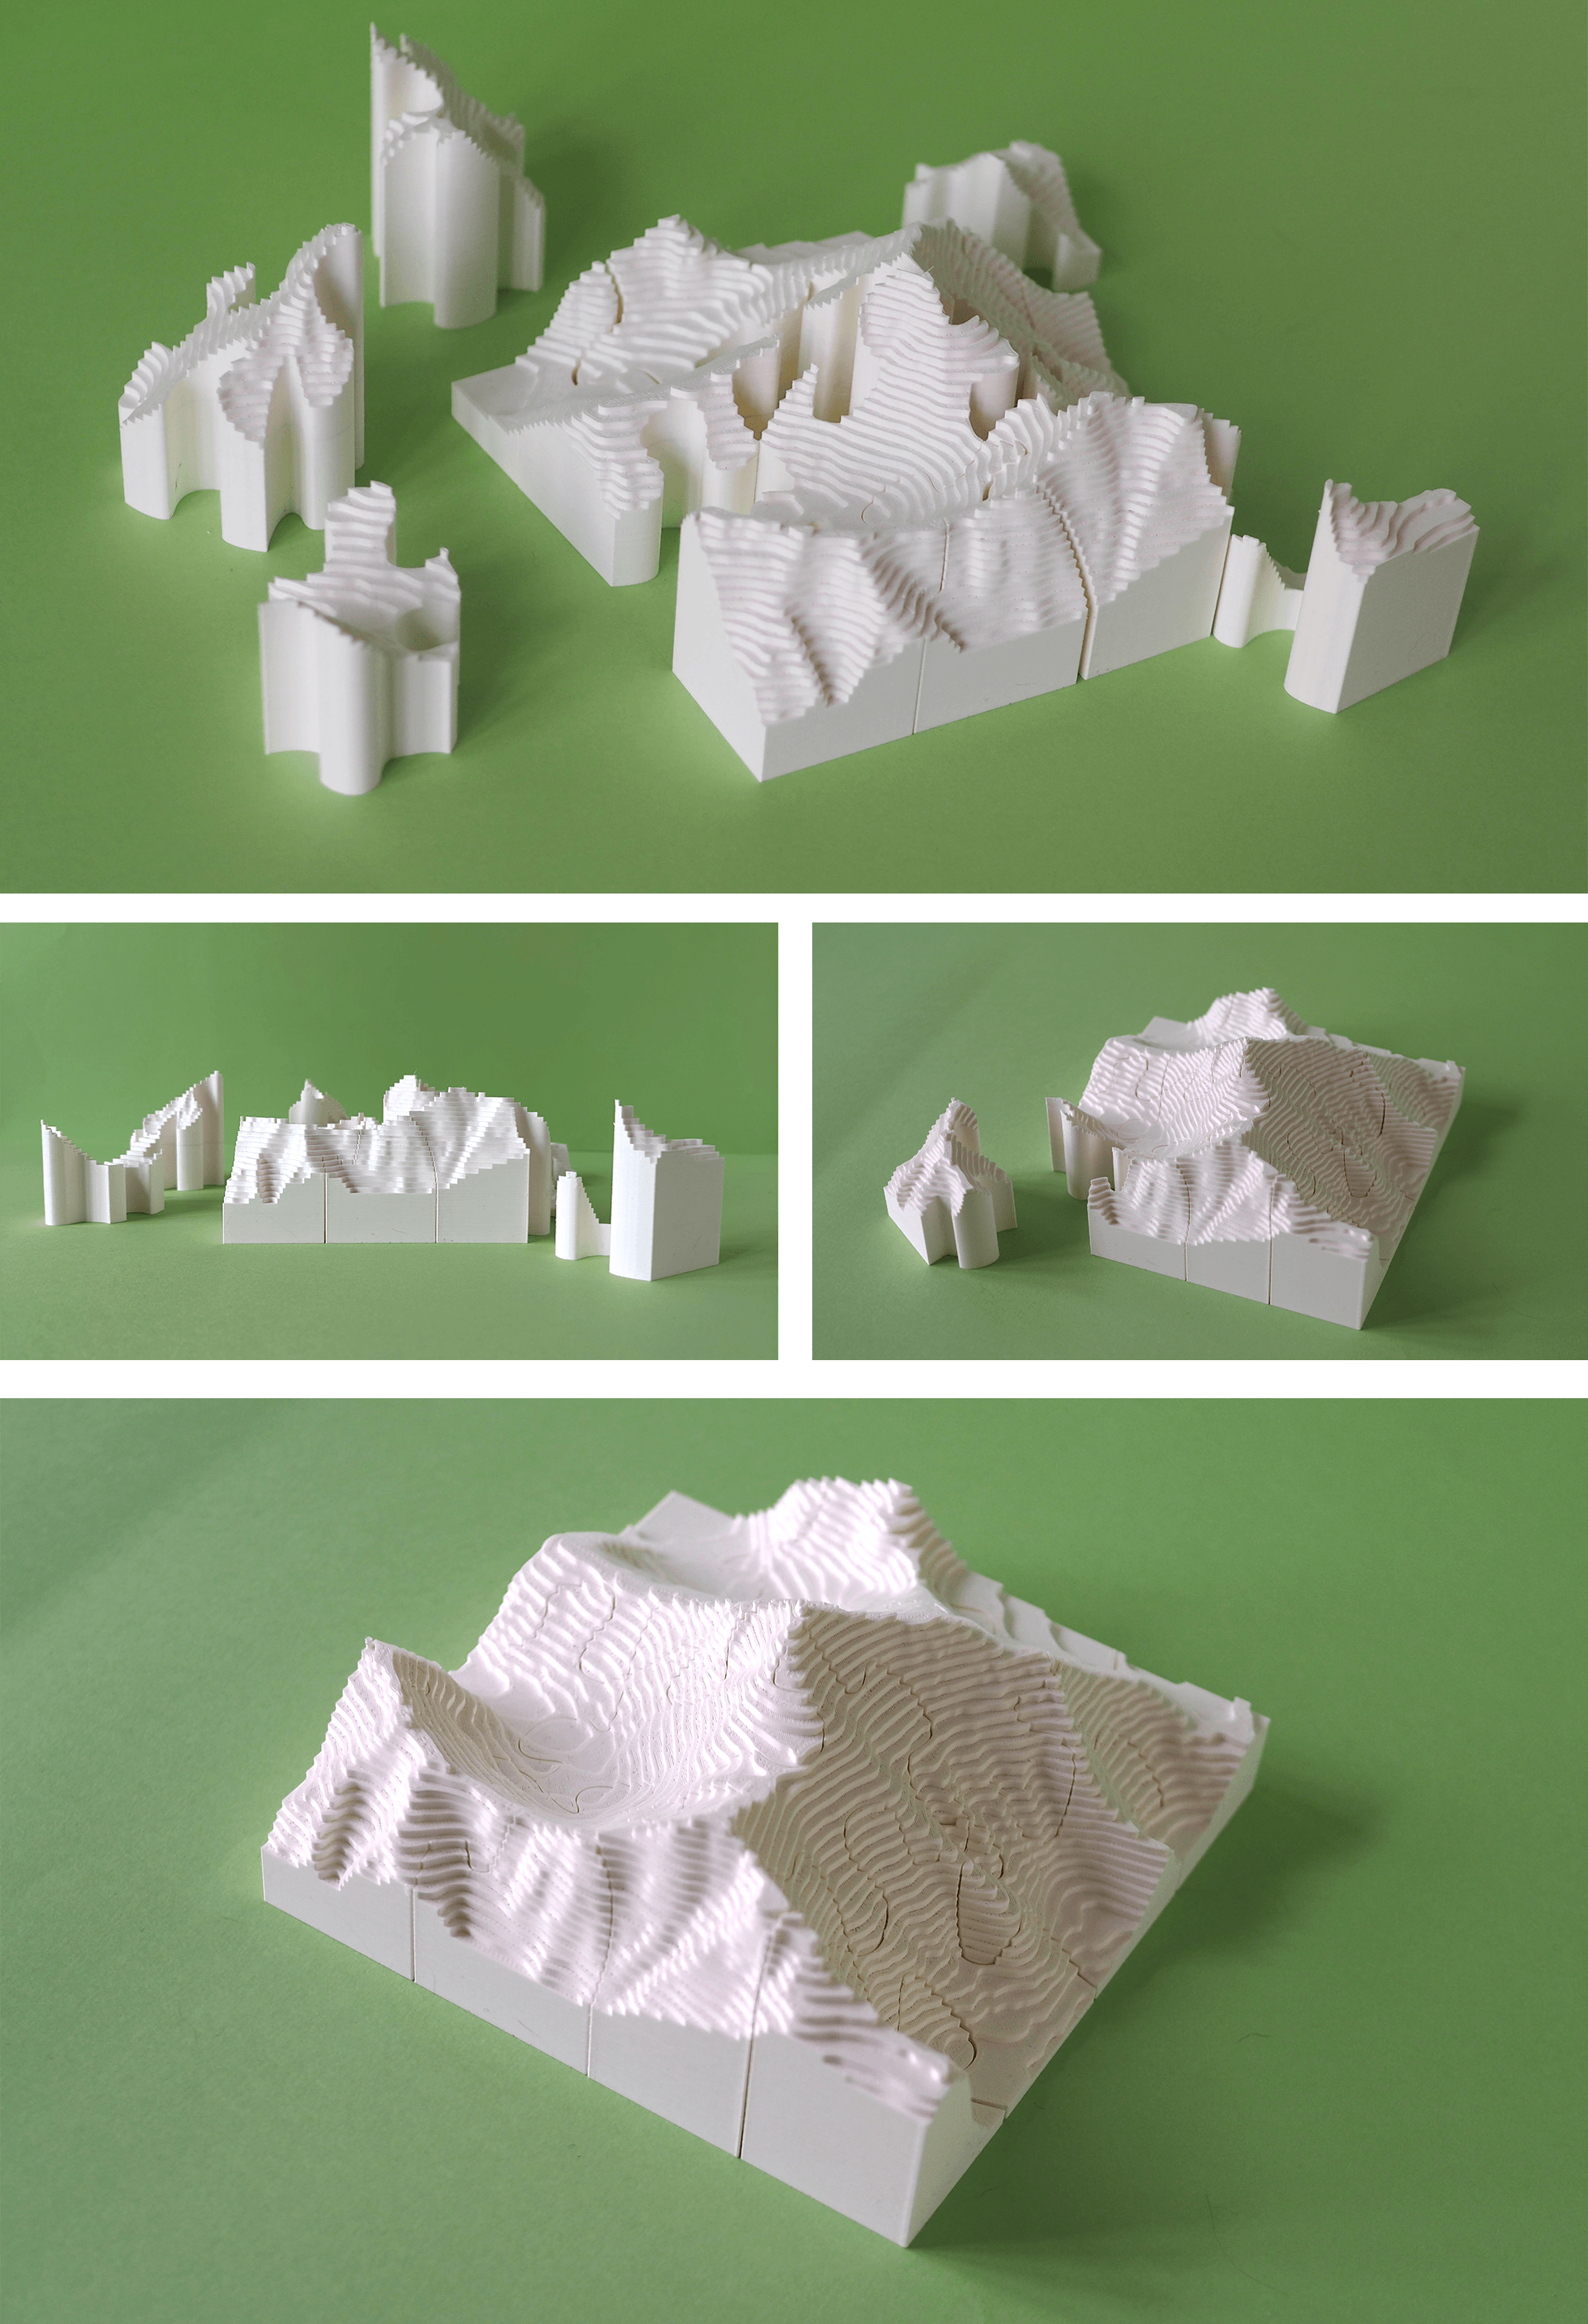
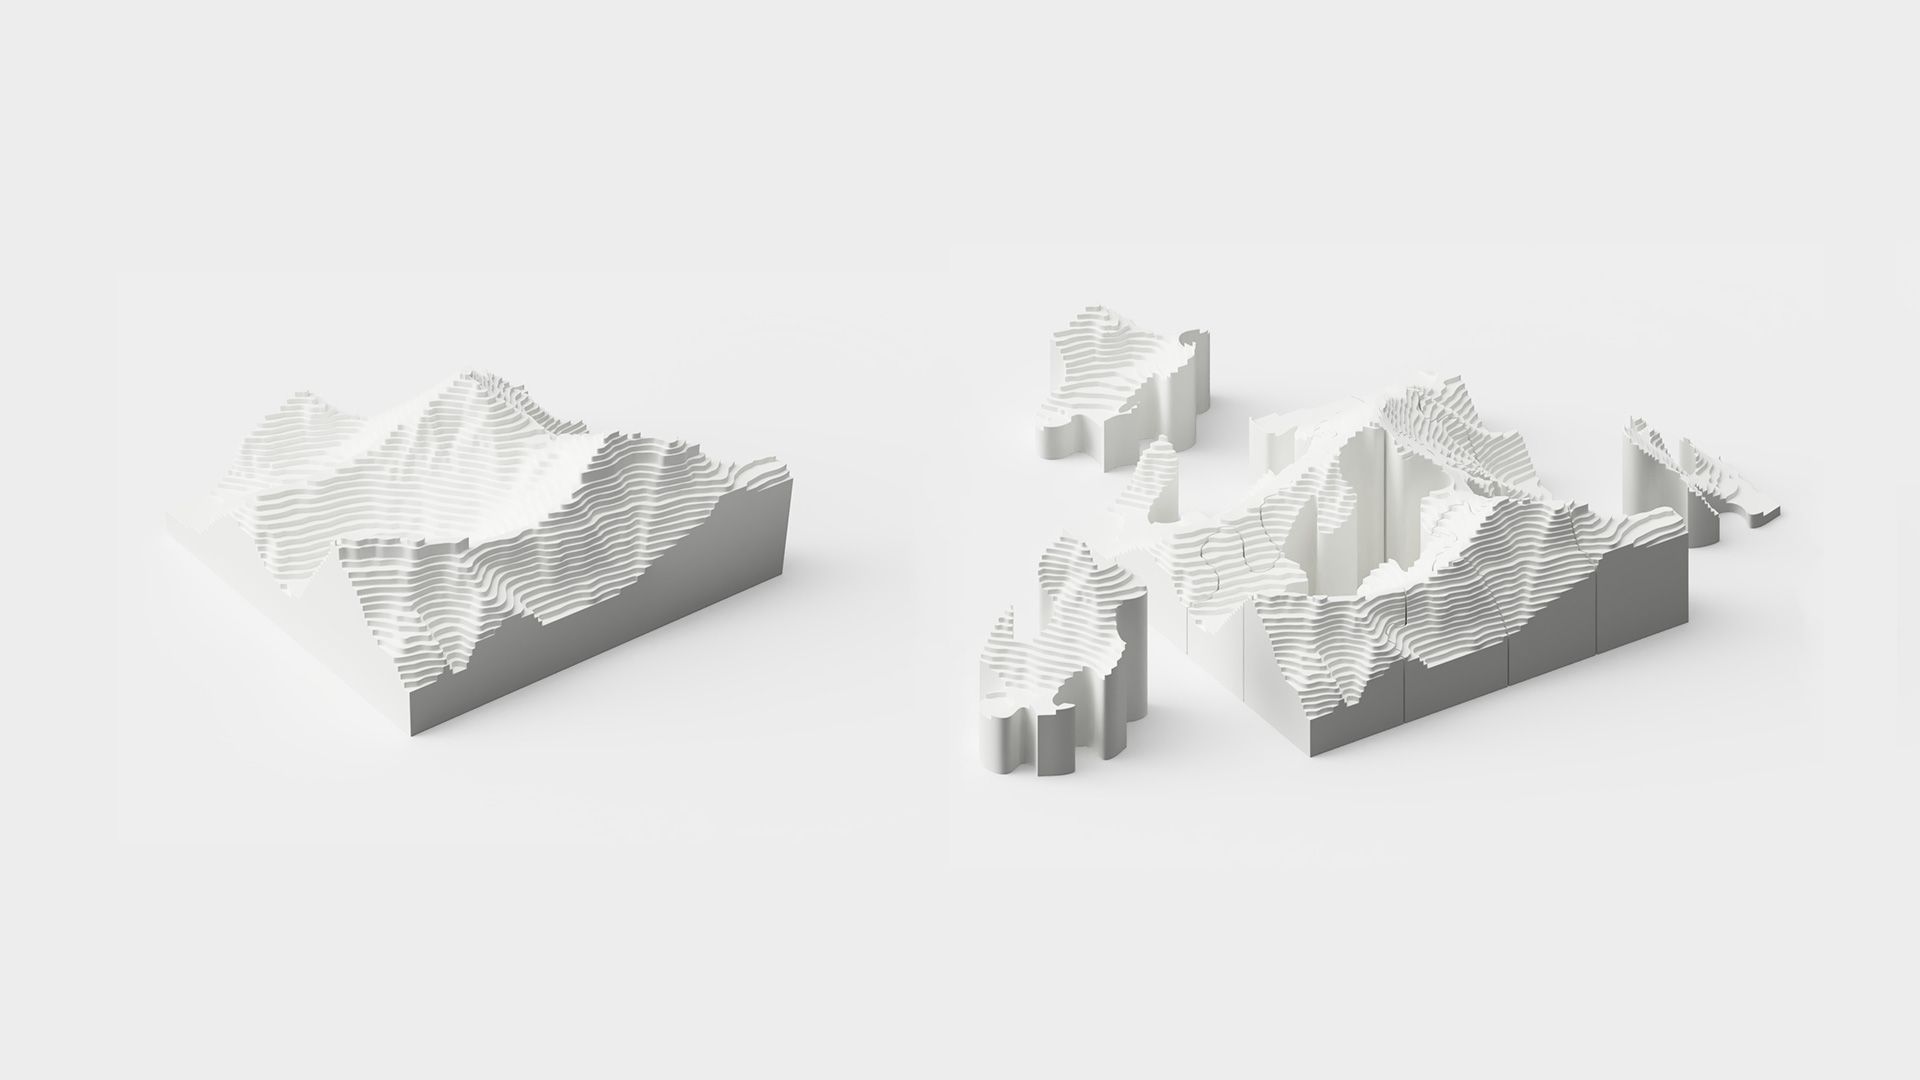
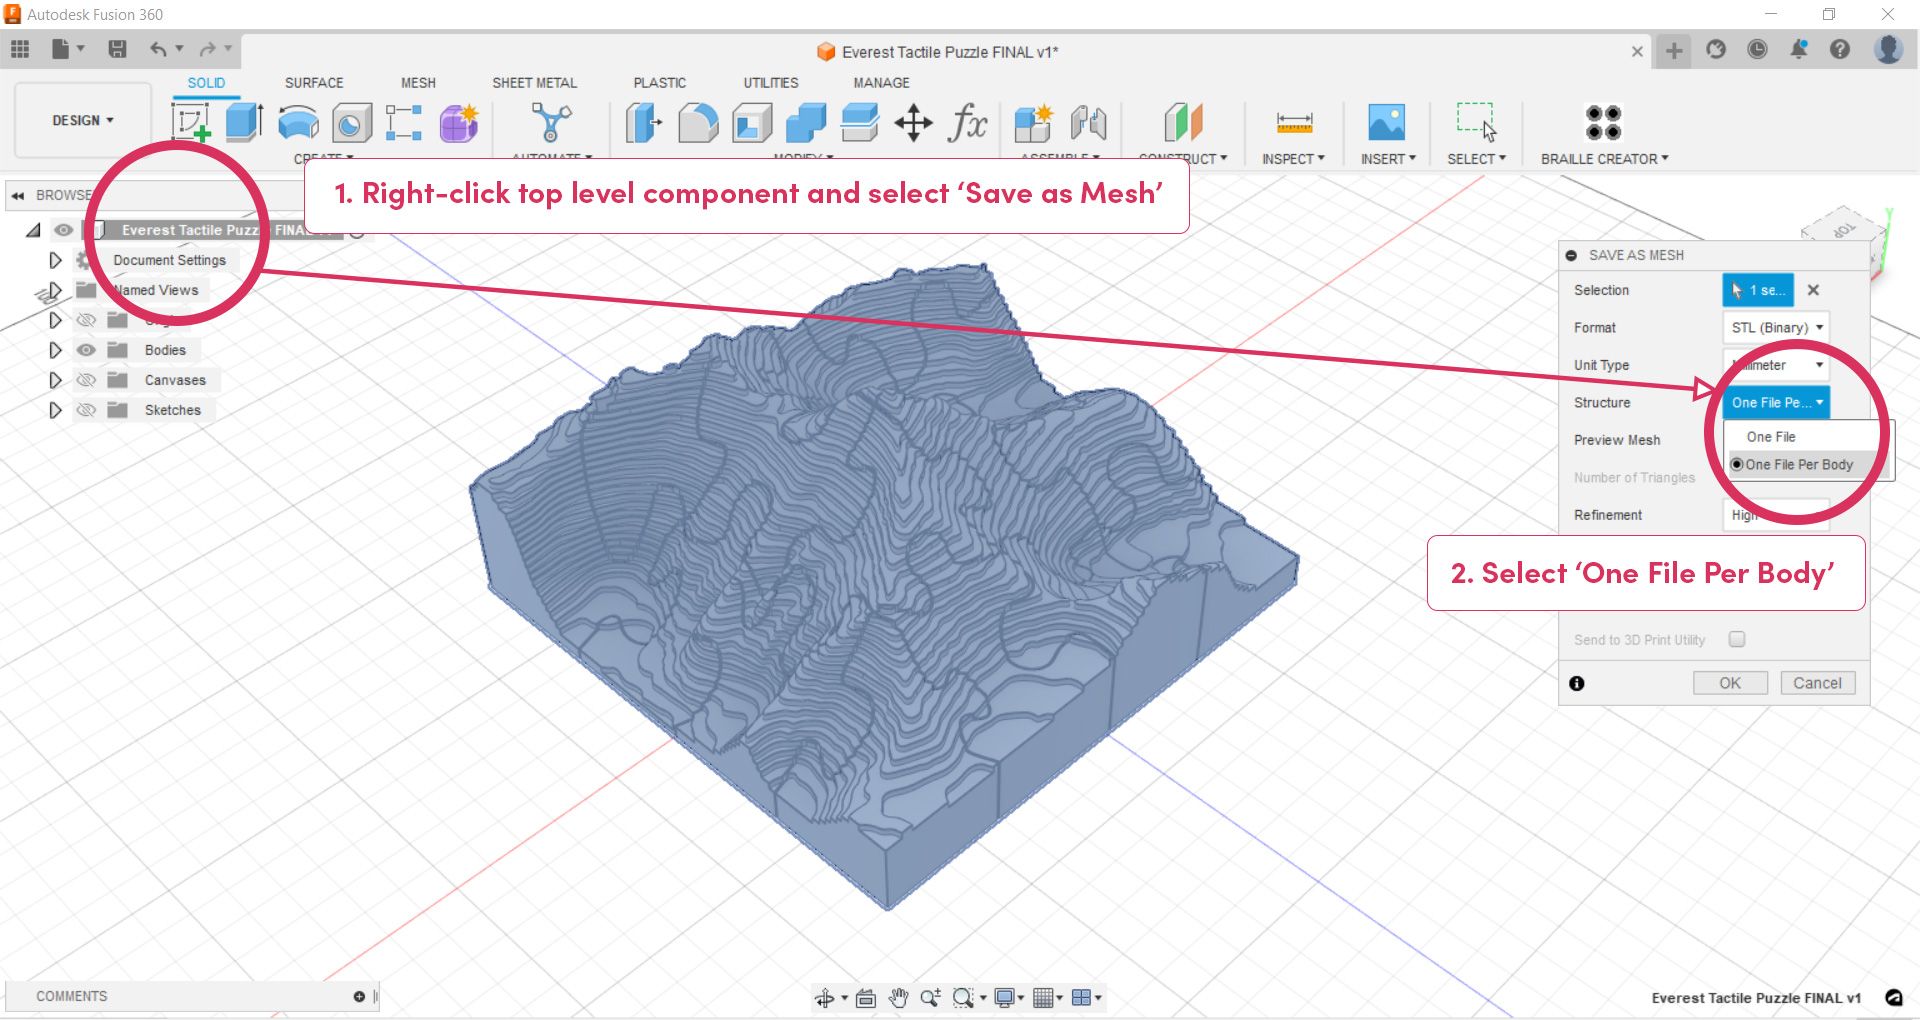
When you have completed the extrude, you will notice your model will be separated into a series of jigsaw pieces! The final step is to simply export the files for 3D printing. You can do this by right-clicking on the top level component (see below image), selecting ‘Save as Mesh’ and then changing the structure to ‘One File Per Body’. Once you click OK, you can select a location to save out your files, which can then be 3D printed!
We’re going to finish up this blog with some images of our final 3D prints for the Mount Everest 3D jigsaw. We hope you enjoy this guide and if you have any questions, feel free to reach out to us at hello@weareprintlab.com.